| Tweet |

Custom Search
|
|

|
||
 1.
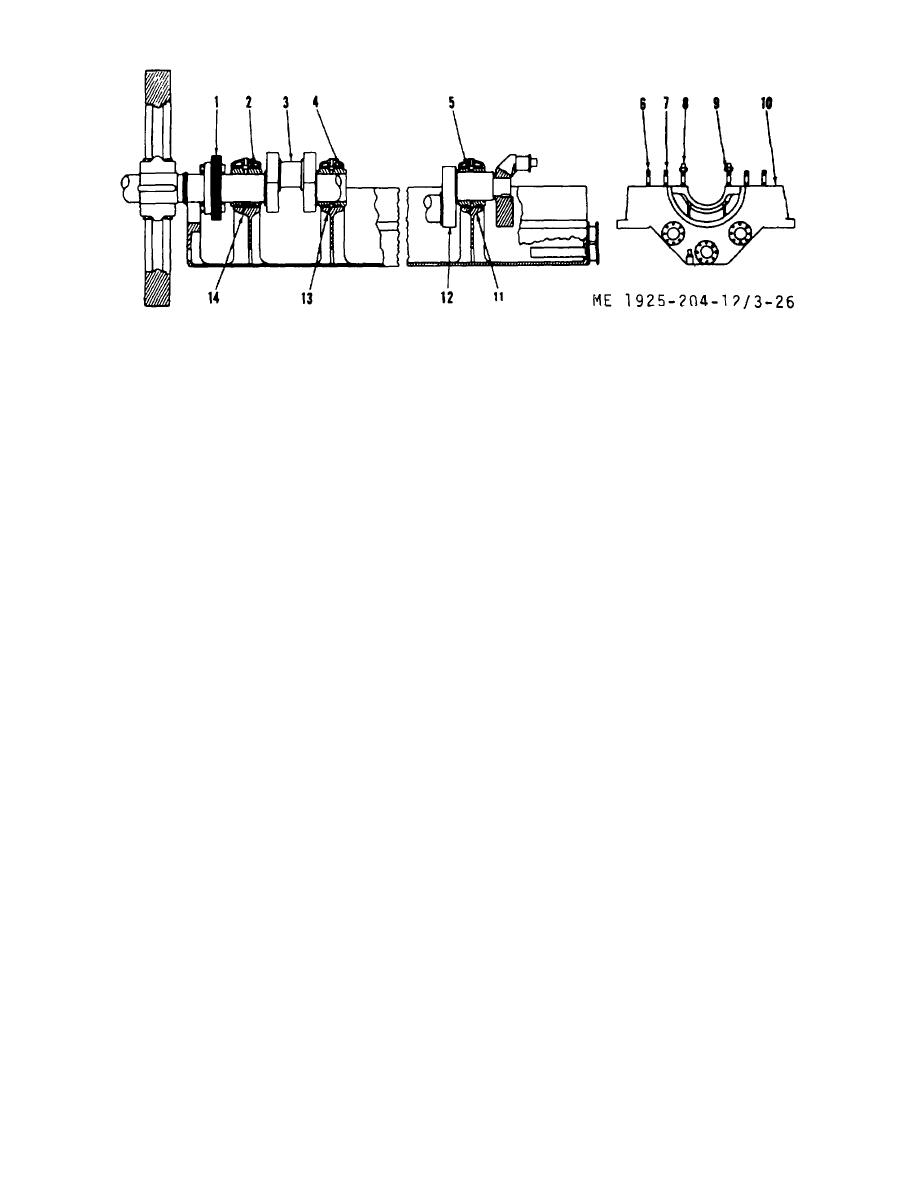
Drive gear
8. Cap stud
2.
Bearing half
9. Stud nut
3.
Crankshaft journal
10. Shims
4.
Bearing half
11. Bearing half, lower
5.
Bearing half
12. Crank web
6.
Cap dowel
13. Bearing half, lower
7.
Shim dowel
14. Bearing half, lower
Figure 3-26. Crankshaft and main bearings.
(4) Place a small jack under the nearest crank web (12)
(6) Inspect the crankshaft bearing surface by feeling for
of the bearing to be removed. Jack the crankshaft up only
a slight ridge around, and in line with, crankshaft oil hole. If a
enough to take the load off the lower main bearing being
ridge is found, report to higher maintenance level.
removed.
d. Replacement of Main Bearing.
(5) Push lower half of main bearing (11) out of saddle
(1) To replace the main bearings proceed as follows:
bore and lift from crankshaft.
(a) Remove the old bearing (shell) from the
(6) Tag upper and lower bearing halves and bearing
bearing cap, upper half. Wash the bearing cap in clean fuel
cap for proper reinstallation identification.
oil and blow dry with compressed air.
c. Cleaning, Inspection, and Repair.
(b) Coat the back of the new bearing shell with a
(1) Before cleaning the bearing, check its surfaces for
thin coat of white lead and press the new bearing shell in the
the presence of "wet liquid oil." This is not an oil smear at the
bearing cap. Check to see that the bearing ends are flush
top of the bearing metal, but liquid oil that has collected
with the bearing cap.
during engine operation. When oil is present, the bearing is
(c) Coat the back of the new bearing shell (lower)
worn and must be replaced.
with a thin coat of white lead. Position the bearing on the
(2) Wash main bearing halves in clean fuel oil and wipe
crankshaft and roll the bearing into the saddle bore.
dry.
(d) Remove the small jack from under the crank
(3) Test the bond between the babbitt bearing (upper)
web.
and the steel back of the bearing cap by holding in one hand
(e) Lock the lower shell into position with clamps
and striking the steel back (bearing cap) with a hammer. It
bored to fit over the bearing studs. The clamps must be wide
should give a clear ringing sound. If a dull thud is heard, the
enough to cover the edges of the bearing metal without
bond between the bearing metal and its steel shell (bearing
touching the crankshaft. Use lengths of pipe to hold the
cap) has probably failed and the bearing should be replaced.
clamps in position and tighten with bearing stud nuts.
(4) Inspect the bearing surface to detect fine cracks.
(f) Coat crankshaft with a thin coat of Prussian
Fine cracks can be caused by a poor fit of the bearing shell in
blue and revolve crankshaft a few times.
its cap or saddle bore, overloading, or overspeeding of the
(g) Remove clamps holding the lower bearing in
engine. Replace bearings that are cracked, however slight.
position. Place the small jack under the crank web. Jack up
(5) Examine the bearing surface for pitting. When the
the crankshaft just enough to relieve weight from the lower
bearing is found to be badly pitted, replace the bearing.
bearing.
(h) Roll the lower bearing out and lift from
3-62
|
||
 |
||