| Tweet |

Custom Search
|
|

|
||
 TM 55-1925-204-12
(3) Loosen capscrews in filter head, holding filter body
to keep it from dropping after screws are fully disengaged.
(4) Place the body in the pan, remove the filter element
from body and open as follows:
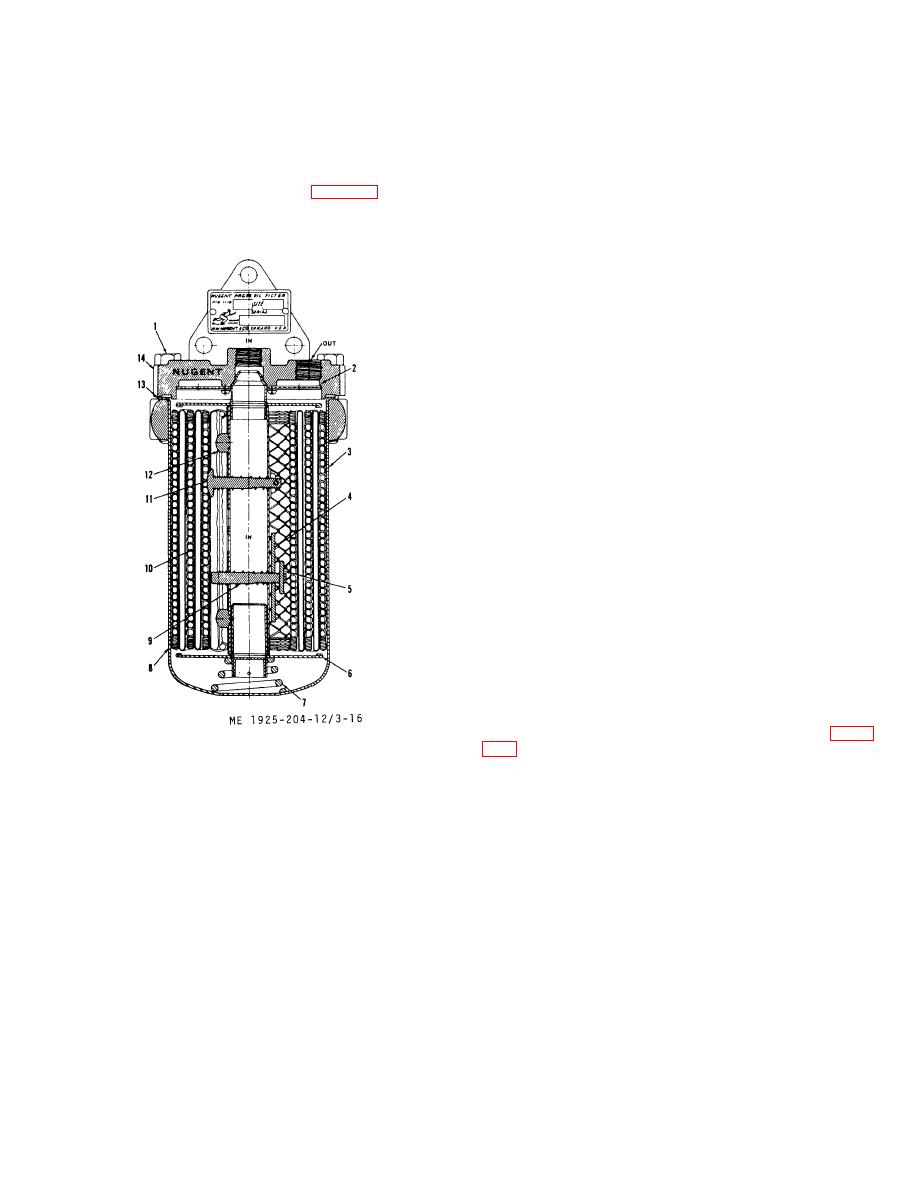
(a) Unscrew the two nuts (4, fig. 3-16) until they
(b) Remove gasket (13) from filter head (14).
touch the pin (5). Turn the pin (5) one-quarter turn to release
the bag (10). Remove bag (10) and spacer (8) from spool (6).
NOTE
On some hulls, it may be necessary to
drain the fuel oil day tank before removing
the relief valve.
(c) To remove the relief valve, isolate the fuel oil
discharge line to the fuel oil day tank. Break the two unions
(one above, one below the relief valve). Place the relief valve
and piping in a vise.
(d) Use a pipe wrench and turn the nipples out of
the inlet side of the relief valve.
(5) Wash the body (3) in clean fuel oil and wipe dry
with a lint free cloth.
(6) Wash spacer (8) in clean fuel oil and blow dry with
compressed air.
(7) Use a wire brush and clean gasket surface of filter
head (14), to remove any traces of the old gasket. Wash in
clean fuel oil and wipe dry with a lint free cloth.
(8) Inspect nipples removed from the relief valve.
Clean threads with a wire brush, if necessary.
(9) Place a new relief valve in vise, tighten carefully.
Do not pinch the valve. Use a pipe wrench and install nipple
in inlet port. Reposition valve in vise and install nipple in
outlet port. Tighten nipples.
(10) Use a new bag and assemble as shown on figure
1.
Capscrew
6.
Spool
10.
Bag
2.
Screen
7.
Spring
11.
Clamp
3.
Body
8.
Spacer
12.
Ring
4.
Nut
9.
Spring
13.
Gasket
5.
Pin
14.
Filter head
Figure 3-16. Half of twin fuel oil filter, cross section.
3-45
|
||
 |
||